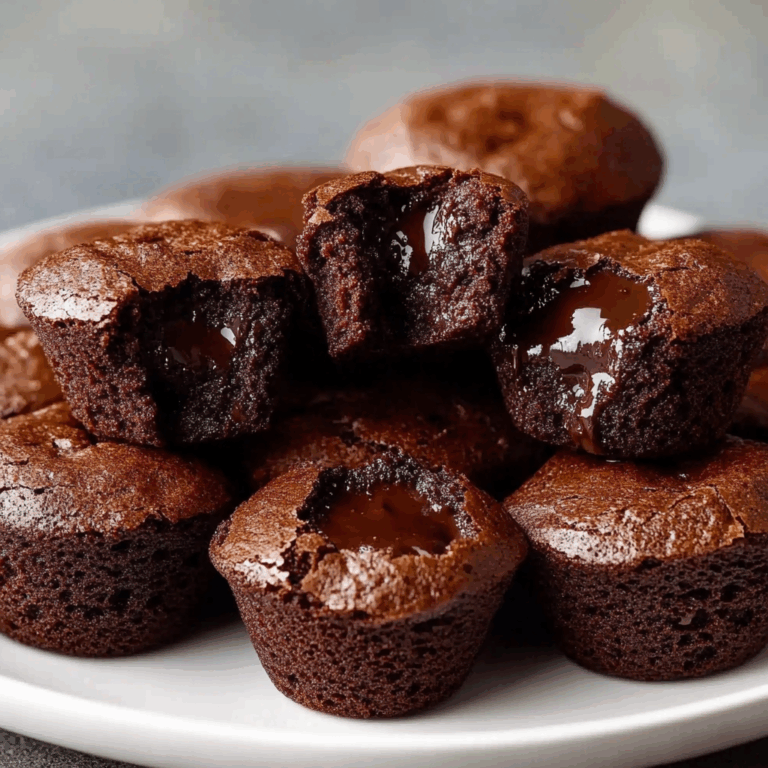
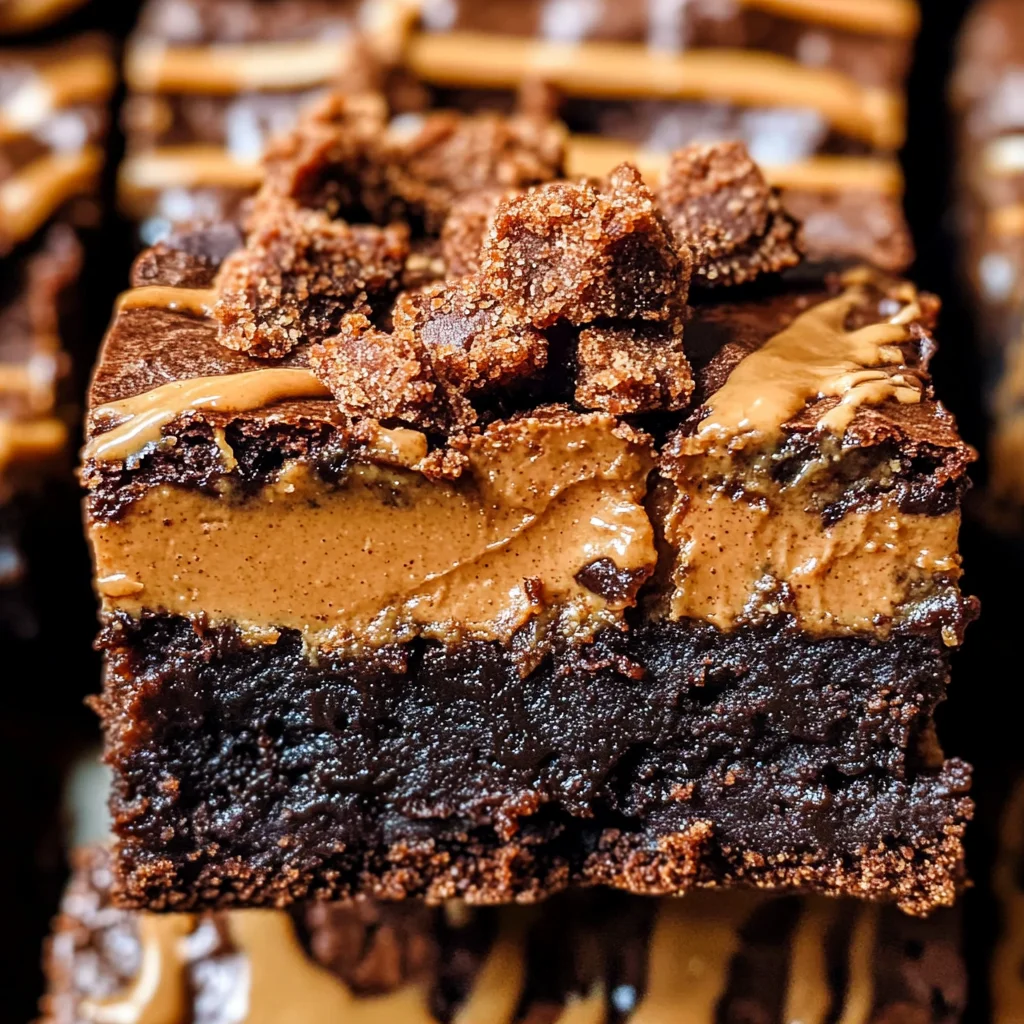
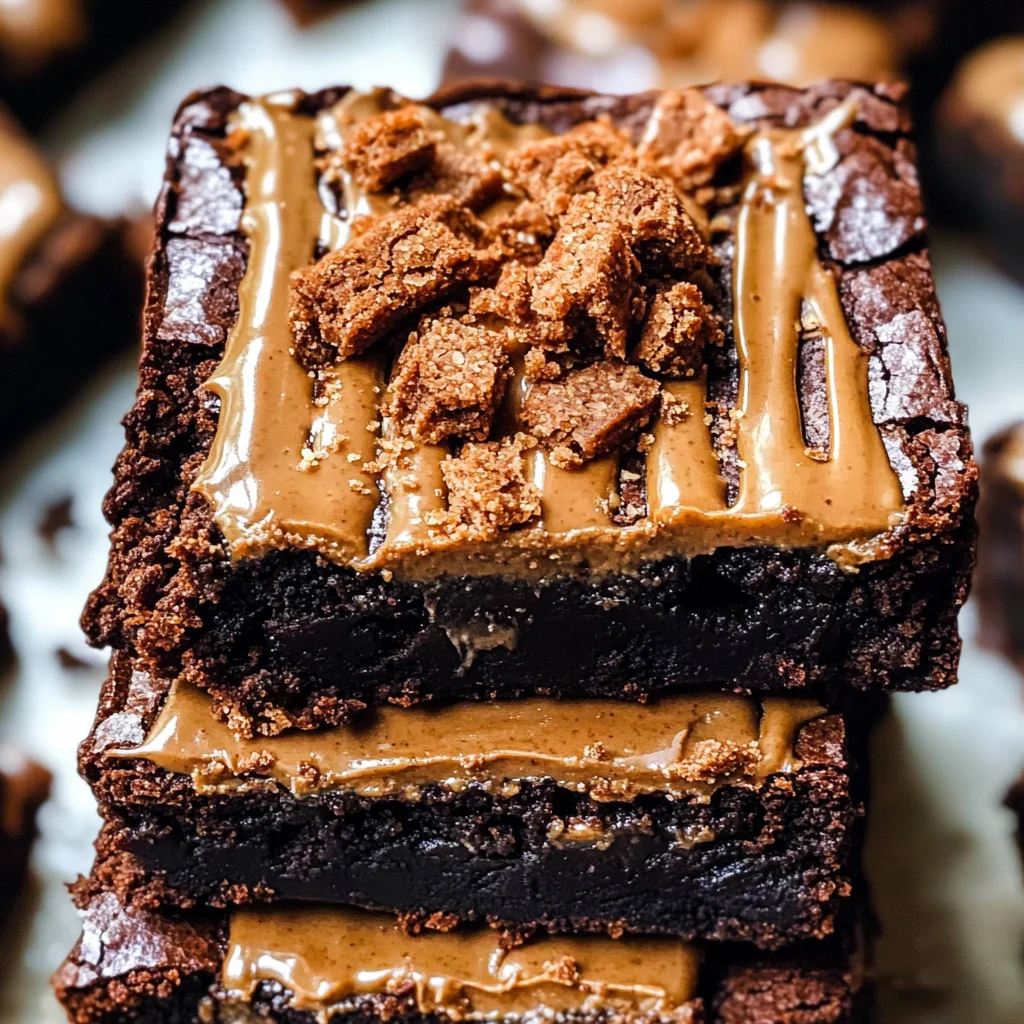
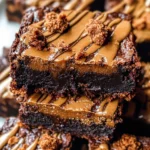
Biscoff Brownies
These fudgy Biscoff brownies are a delightful treat that will satisfy any sweet tooth. With a rich chocolate brownie base, gooey cookie butter filling, and a crunchy Biscoff cookie topping, they are perfect for any occasion—from family gatherings to cozy nights in. The unique combination of flavors makes these brownies stand out from the crowd, ensuring everyone will be asking for seconds.
Why You’ll Love This Recipe
- Decadent Flavor: The mix of chocolate and Biscoff cookie butter creates an irresistible taste experience.
- Easy to Make: With simple steps and readily available ingredients, you can whip these up in no time.
- Versatile Treat: These brownies are great for parties, potlucks, or just as a sweet snack at home.
- Delightfully Gooey: The cookie butter layer adds a gooey texture that perfectly complements the fudgy brownie base.
- Perfect for Sharing: Cut them into squares and share with friends or keep them all to yourself—no judgment here!
Tools and Preparation
To make your baking experience seamless, you’ll need a few essential tools. Gathering these before you start will help ensure everything goes smoothly.
Essential Tools and Equipment
- 8×8 baking pan
- Parchment paper
- Mixing bowls
- Whisk
- Microwave-safe bowl
Importance of Each Tool
- 8×8 baking pan: This size ensures even cooking and helps achieve that perfect brownie texture.
- Parchment paper: Lining the pan with parchment allows for easy removal of the brownies without sticking.
- Mixing bowls: Having multiple bowls helps keep your ingredients organized while mixing.
- Whisk: A whisk is essential for achieving a smooth batter without lumps.
Ingredients
These fudgy Biscoff brownies are packed with Biscoff flavor! Made with a rich chocolate brownie base, a layer of gooey cookie butter, and Biscoff cookies on top.
For the Brownie Base
- 3/4 cup Biscoff cookie butter
- 1/2 cup light or dark brown sugar (packed)
- 1/2 cup granulated sugar
- 2 large eggs
- 1 large egg yolk
- 1 tablespoon vanilla extract
- 10 tablespoons unsalted butter
- 2/3 cup + 1/4 cup semi-sweet chocolate chips
- 1/4 cup unsweetened Dutch cocoa powder
- 2/3 cup + 1 tablespoon all-purpose flour (see notes below on measuring)
- 1 teaspoon espresso powder
- 1/2 teaspoon fine sea salt
For the Topping
- 4-5 Biscoff cookies (for the top)
- Extra cookie butter (for the top)
How to Make Biscoff Brownies
Step 1: Prepare the Pan
Press a large piece of parchment paper into a square metal 8×8 baking pan. Crease the bottom edges so you can see the outline of the pan when you take it out. Evenly spread the cookie butter inside the creased edges, then chill it in the freezer until firm. Check to ensure it’s completely firm before moving on to the batter.
Step 2: Preheat Your Oven
Line the baking pan with parchment paper so it hangs off all four sides for easy removal. Preheat your oven to 350 F (180 C).
Step 3: Mix Sugars and Eggs
In a mixing bowl, whisk together the sugars, eggs, and vanilla extract until well combined.
Step 4: Melt Chocolate and Butter
Melt the butter and chocolate chips together in a microwave-safe bowl until smooth. Whisk in cocoa powder until fully incorporated. Then combine this melted mixture with your egg mixture until just mixed.
Step 5: Combine Dry Ingredients
Fold in flour, espresso powder, and salt until just combined. Avoid over-mixing to keep your brownies fudgy.
Step 6: Assemble Brownies
Pour half of your brownie batter into the prepared pan and spread it evenly to fill corners (about 340 grams). Place your frozen cookie butter square on top of this batter after peeling off its parchment paper. Pour the remaining batter over this layer.
Step 7: Add Cookie Topping
Break up Biscoff cookies into pieces and press them into the top of your brownie batter. Warm 2 tablespoons of cookie butter in the microwave for about 15-20 seconds until it’s runny; drizzle this warm cookie butter over the top.
Step 8: Bake Brownies
Bake your brownies in preheated oven for about 30-40 minutes or until a toothpick inserted into the center comes out covered in moist crumbs. Let cool completely on a wire rack before removing from pan.
Step 9: Enjoy!
You can drizzle more cookie butter on top before cutting them into squares, then enjoy! Store leftovers in an airtight container at room temperature for up to 2-3 days or freeze them for up to one month.
How to Serve Biscoff Brownies
These delicious Biscoff brownies are perfect for any occasion, and serving them can elevate your dessert experience. Here are some creative ways to serve these fudgy treats.
A La Mode
- Add a scoop of vanilla or caramel ice cream on top of a warm brownie for a delightful contrast of temperatures and flavors.
Drizzled with Chocolate Sauce
- Warm some chocolate sauce and drizzle it over the brownies just before serving for an extra layer of indulgence.
With Fresh Berries
- Serve the brownies with a side of fresh strawberries, raspberries, or blueberries to add a refreshing and fruity touch.
Topped with Whipped Cream
- Lighten up the rich flavors by topping your brownies with a dollop of whipped cream. You can also sprinkle some cocoa powder for an elegant finish.
Pair with Coffee or Tea
- A nice cup of coffee or herbal tea complements the sweetness of Biscoff brownies perfectly, enhancing the overall tasting experience.
How to Perfect Biscoff Brownies
Perfecting your Biscoff brownies will ensure they turn out rich and fudgy every time. Here are some helpful tips.
- Use room temperature ingredients: This helps the batter mix more easily, leading to a smoother texture.
- Don’t overmix the batter: Fold in dry ingredients just until combined for that perfect fudgy consistency.
- Chill the cookie butter layer: Ensure it’s firm before adding it to the brownie batter for cleaner layers.
- Check for doneness: Insert a toothpick into the center; it should come out with moist crumbs but not wet batter.
- Store properly: Keep leftovers in an airtight container to maintain freshness for up to 2-3 days at room temperature.
Best Side Dishes for Biscoff Brownies
Serving side dishes alongside your Biscoff brownies can create a well-rounded dessert experience. Here are some great options:
- Vanilla Ice Cream: A classic pairing that brings a creamy element to balance the rich chocolate flavor.
- Fresh Fruit Salad: A light and refreshing option that adds a burst of color and natural sweetness.
- Chocolate Mousse: For chocolate lovers, this airy dessert adds an elegant touch without overpowering the brownie.
- Caramel Sauce: Drizzling warm caramel over brownies enhances their sweetness and adds complexity.
- Nutty Trail Mix: A crunchy side that contrasts nicely with the soft texture of the brownies while providing added nutrients.
- Coffee Granita: This chilled coffee dessert offers a refreshing palate cleanser between bites of rich brownie.
- Coconut Whipped Cream: A dairy-free alternative that pairs beautifully with the flavors in Biscoff brownies.
- Chocolate-Covered Strawberries: These sweet bites add an elegant flair and complement the brownie’s richness perfectly.
Common Mistakes to Avoid
Making Biscoff brownies can be simple and fun, but there are a few common mistakes that can prevent you from achieving the perfect treat.
- Using warm butter: Always melt your butter and chocolate until smooth, but let them cool slightly before mixing. This prevents cooking the eggs when added.
- Overmixing the batter: Mix just until combined when adding flour and cocoa. Overmixing leads to tough brownies rather than fudgy ones.
- Not chilling the cookie butter layer: If you skip chilling the cookie butter, it may not hold its shape during baking. Ensure it’s completely firm for best results.
- Skipping the parchment paper: Lining your pan with parchment makes it easier to remove the brownies later. Don’t skip this step for a clean cut.
- Underbaking or overbaking: Keep an eye on your brownies while baking. They should come out with moist crumbs on a toothpick, not wet batter or completely dry.
Storage & Reheating Instructions
Refrigerator Storage
- Store Biscoff brownies in an airtight container.
- They will keep fresh for 2-3 days in the refrigerator.
Freezing Biscoff Brownies
- Freeze brownies in an airtight container or freezer bag.
- They can last up to 1 month in the freezer.
Reheating Biscoff Brownies
- Oven: Preheat to 350°F (175°C) and warm brownies for about 10 minutes.
- Microwave: Heat for 15-20 seconds for a quick warm-up.
- Stovetop: Use a skillet over low heat, covering it to retain moisture while warming.
Frequently Asked Questions
Here are some common questions about making Biscoff brownies that might help you perfect your baking experience.
Can I use other types of cookie butter for Biscoff Brownies?
Yes, feel free to experiment with different flavors of cookie butter. Just ensure they have a similar texture for optimal results.
How do I know when my Biscoff Brownies are done?
Biscoff brownies are done when a toothpick inserted into the center comes out with a few moist crumbs attached.
Can I make these brownies gluten-free?
Absolutely! Substitute all-purpose flour with a gluten-free blend that measures cup-for-cup.
What can I add to my Biscoff Brownies?
You can customize your brownies by adding nuts, chocolate chunks, or even swirls of additional cookie butter on top before baking.
How should I store leftover Biscoff Brownies?
Store leftovers in an airtight container at room temperature for 2-3 days or in the fridge for longer freshness.
Final Thoughts
These delicious Biscoff brownies combine rich chocolate flavor with creamy cookie butter, making them an irresistible dessert choice. Their fudgy texture paired with customizable options allows you to get creative! Give this recipe a try and enjoy your delightful creation!
Biscoff Brownies
Indulge in the ultimate dessert experience with these fudgy Biscoff brownies. Each bite features a rich chocolate brownie base topped with a layer of gooey cookie butter and crunchy Biscoff cookie pieces, creating a delightful combination of flavors and textures. Perfect for gatherings or cozy nights at home, these brownies are sure to satisfy any sweet craving. With simple ingredients and straightforward instructions, you can whip up this decadent treat in no time. Whether enjoyed warm or at room temperature, these brownies are bound to impress family and friends alike.
- Prep Time: 15 minutes
- Cook Time: 35 minutes
- Total Time: 50 minutes
- Yield: Approximately 12 servings 1x
- Category: Dessert
- Method: Baking
- Cuisine: American
Ingredients
- 3/4 cup Biscoff cookie butter
- 1/2 cup light or dark brown sugar
- 1/2 cup granulated sugar
- 2 large eggs
- 10 tablespoons unsalted butter
- 2/3 cup semi-sweet chocolate chips
- 1/4 cup unsweetened Dutch cocoa powder
- 2/3 cup all-purpose flour
- 4–5 Biscoff cookies (for topping)
Instructions
- Preheat your oven to 350°F (180°C) and line an 8×8 baking pan with parchment paper.
- In a mixing bowl, whisk together the sugars, eggs, and vanilla extract.
- Melt the butter and chocolate chips in a microwave-safe bowl until smooth, then mix in cocoa powder.
- Combine the melted mixture with the egg mixture until just combined.
- Fold in flour, espresso powder, and salt until fully incorporated.
- Pour half of the brownie batter into the prepared pan, followed by a layer of frozen cookie butter. Top with remaining batter.
- Add broken Biscoff cookies on top and drizzle with warmed cookie butter.
- Bake for about 30-40 minutes until a toothpick comes out with moist crumbs. Let cool before cutting.
Nutrition
- Serving Size: 1 brownie (approx. 60g)
- Calories: 290
- Sugar: 24g
- Sodium: 120mg
- Fat: 16g
- Saturated Fat: 9g
- Unsaturated Fat: 6g
- Trans Fat: 0g
- Carbohydrates: 33g
- Fiber: 1g
- Protein: 3g
- Cholesterol: 50mg